Touch Alarm circuit is widely used for security, which is installed on the door. The advantages of this alarm is because the cost is cheap and difficult to detect by burglars / intruders. The following is an example of a touch of alarm circuit which is designed by Tony Van Roon.
Components List:
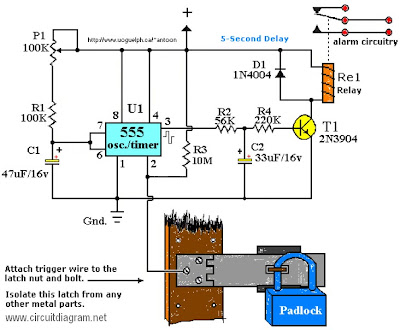
R1 = 100K
R2 = 56K
R3 = 10M
R4 = 220K
P1 = 100K
D1 = 1N4004 | T1 = 2N3904, or equivalent
U1 = 555 Timer*
C1 = 47μF/16V**
C2 = 33μF/16V**
Re1 = Relay*** |
Notes:
*The 555 can be a LM, NE, or MC(cmos) type, they’re all pin-compatible.
**C1/C2′s operating voltage should be elevated to 25V if you decide to go with a 12V energy source. Rule of thumb: the operating voltage of capacitors are at least double the supplied voltage, in other words, if the powersource is 9Volt, your capacitor(s) is a minimum of 18V. Transistor T1 could be any approximate substitute.
*** Use any suitable relay for the project and if you are not tight on area, use any size. I’ve develop this specific circuit to prevent students from fiddling using the security cameras in pc labs in the University I’m employed. I made certain the metal casing was not grounded. But as the schematic shows you can essentially hook it as much as any type of metal surface. I utilized a 12-vdc power adapter. Use any appropriate relay to handle your requirements. A ‘RESET’ switch (Usually Closed) can be added between the constructive and the ‘arrow-with-the-+’. The trigger (touch) wire is connected to pin 2 of the 555 and will trigger the relay, utilizing the body resistance, when touched. It is apparent that the ‘touching’ component has to be clean and can make good get in touch with with the trigger wire. This particular circuit may not be suitable for all applications. Just in case you wonder why pin 5 isn’t listed within the schematic diagram; it isn’t truly required. In certain noisy conditions a little ceramic capacitor is placed in between pin 5 and ground. It does no harm to add one or leave it out.
Extra note: For all those of you who didn’t discover, there is an approximate 5-second delay build-in prior to activation of the relay to avoid false triggering, or a ‘would-be’ thief, etc.


